Wednesday, February 29, 2012

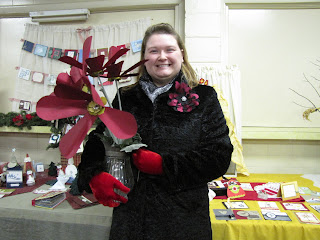
Dresden Design #4 - Large Paper Flowers

I know, you are thinking "another project with the Dresden Plate, really????"
Yes, really!!!
As you can see, all I did was cut out both a large and small Dresden Design pattern 
using SU Ridinghood Red paper.


The centers and under leaf are made from:
Basic Black, So Saffron (a pale yellow), and Old Olive (an off green) paper.

The shapes for the centers are made with a SU flower die for the Sizzix Big Shot, 
but you could use any flower paper punch.
First, I attached the center of the flower together by building the paper center 
and then putting a jumbo silver brad through the entire center piece.
After that, I hot glued 5 red Dreden petals to the center
(see how I matched the large petals with the way the green center petals go).

When the center is attached to the petals, then you can hot glue
 the bottom leaves under the flower
(be sure to only glue the center, so that you can fold the leaves down).
Putting this piece under the flower also helps to stablize it.
When my flowers were made, I just simply attached them to some artificial stems 
that I used from some old silk flowers.
Now you have beautiful handmade paper flowers that your friends may try to steal.

For more projects that use the Dresden Design click the links below:

Tuesday, February 14, 2012

Easy Truffle Recipe


 How to dip truffles into chocolate 
&
Melting chocolate tips
After mixing and freezing the above recipe, 
I prepare to dip the truffles in chocolate.

Melting tips:
- only melt about 1 cup at a time
- microwave method: place in glass bowl in microwave for 1 minute & stir.
   (If the chocolate is not fully melted after stiring thoroughly, place back in and stir at 
   30 sec. intervals.  *Remember that if you cook chocolate too long it looses its 
   consistancy.  So try not to over cook.  It will continue to melt for a while after you get 
   it out of the microwave because the glass bowl is hot).
- prefered method: I do not have a microwave, so I boiled water on the stove.  To melt
   your chocolate~ place a glass coffee mug with 1 cup of chocolate in a glass bowl.  
   Now pour boiling water in the bowl around the coffee mug.  Let sit for about a minute 
   and then stir. Your chocolate will become silky smooth the more you stir.  I love melting 
   chocolate this way,  because I don't waste any and it is melted perfectly (no overheating   
   here).

Now dip your truffles!


Helpful hints:
~ be sure that your truffles are frozen or they will be too soft to dip properly
~ keep a metal spoon in your chocolate (it helps to conduct the heat 
and keeps it from hardening faster)
~ dip using a small condiments fork or shishkabob skur


I dip the truffles and place them right onto
mini cupcake papers.

my Christmas  truffles - Yum!!!
 Place your choice of nuts, sprinkles, coconut,
or whatever you want on top.


Package in an airtight bag or container.
*They only last about a week on the counter, so freezing is suggested.

Hope your Valentines day was as sweet as my truffles!

Woven Ribbon Hearts


As I have been going through my craft room, 
I noticed this neat bunch of woven red ribbons 
that I had been saving for "some project, one day".


This is the project I came up with - Woven Ribbon Hearts.


To make these hearts I first cut three different lengths of woven ribbon.


Form your smallest length into a heart shape with the cut ends in the middle.
I used the darkest ribbon as my center.
Staple the center ends together (like the picture below).


Now repeat by adding the next layer.
*Do not staple this layer, until the last layer is in place.


Now add the largest layer and staple all three layers together.


Staple the three hearts together at the bottom.
This step secures them all into place.


Now you can make lots of Woven Ribbon Hearts.


This project was very easy and alot of fun.


There are so many possibilities!


PERFECT LOVE

The theme for girls camp this weekend is
TRUE LOVE = KNOWING JESUS.

I don't really get to help very much with the camp program anymore since I am mostly busy raising support to go to South Africa as a missionary.

God has been impressing upon my heart the fact that He alone has perfect love.
Many teen girls struggle with the desire to find love.
They normally look in all of the wrong places.  

This banner will be moved from my wall this week and placed on the camp bulletin board.
It will serve as a reminder that God's love is perfect.
"Perfect love casteth out fear" - I John 4:18
"If we love God, love is perfected in us" - I John 4:12
We can conquer anything with His love - Romans 8:37
...and many more.

How to make the PERFECT LOVE Banner:
Step 1: Cut out a heart shape for each letter on the banner.
(I used the Creative Memories Heart template 
on Stampin Up Designer double sided Scrapbook paper.)

Step 2: Cut a letter frame out of plain colored card stock for each heart.
(I used a variety of colors and cut it using another CM template.)

Step 3: Use a distressing tool on the inside and outside of each frame.
(This makes that layer of paper really stand out from the base.)

Step 4: Lettering :  I used Stampin Up Chip boards letters (as you can see, some are the actual letters and others are the piece that the letter comes out of).  Color each with a red Sharpie.

Step 5: Put the banner together by- 
a. Hot glueing ribbon through the center of each of the hearts on the top layer 
                    (through the word "perfect") on the banner.  Leave space between each 
                     heart.
                 b. Add the second layer ("love") to the banner by gluing the tips pf the hearts 
                     to the sides of the hearts on the first layer (see above photo).
                 c. Glue the word frames on top of the lace ribbon and heart base.
                 d. Punch a 2 1/2 in. circle out of white cardstock for behind each letter and
                     cover the back of each frame letter with white card stock.
                 e.Glue the letters to the banner.
Step 6: Embelish, embelish, embelish!!! (I used stuff I had laying around the craft room.)


To view more about the PERFECT LOVE Banner CLICK HERE

Along with this fun banner project, I made a few other things.
Like the fiber colored hearts (in the picture above and below).
I also used SU Digital studio to design and print off a bunch of Bible verses 
that go with the "Perfect Love" theme.

We will also hang some of these woven ribbon hearts in the windows.
(For instructions on how to make them click here)


Did you do any special Valentine projects?
How has God shown His PERFECT LOVE to YOU?

Thursday, February 9, 2012

Easy Gift Idea #3 - Recordable Picture Frame

Did you know that Stampin' Up sells recordable cards?
Recordable cards are so much fun, but most of the time they eventually get stuffed in a drawer somewhere.

I like to give gifts to people that bless their lives.
So, I came up with the idea to make my own recordable picture frames.

In just a few short months I will be moving from the USA to South Africa.  
I know that once I am there, 
I will miss hearing the voices of my family and friends.  
God has blessed me with so many amazing people in my life.
If I could record everyone's voice with a special message I would.

Anyway, here is how you too can make a recordable picture frame.

I usually take the SU recordable card and cover the front with a piece of  cardstock and clear plastic (I cut up a page protector).
Be sure to leave the top open like a pocket so the picture can be replaced.
Now you can make the frame.


First, measure your picture frame.
Then, I put together what looks like a scrapbook page to fit the frame.
Just add the paper layers, colors and wording that you want.


Now place the page into the frame.


I like to add puffy sticker letters on top of the glass
to make the frame even more three-dimensional.


Then use Stampin Up's Red Sticky Strip to adhere the recordable card 
to the glass of the picture frame.
(You'll love this tape, it sticks to everything!)


I cut flower centers out of the scrapbook paper,
place them on dimensionals,
ans press them onto the flowers.
*Be careful when you press all of these things onto the glass.
If you press too hard it will break (speaking from experience).


Now add a tab to open the card
and
your favorite picture to go in the frame.


Your frame is finished, as soon as, you record a saying in your card.
(Just follow the instructions on the package.)

Hopefully, this will inspire you to capture some memories of your own.

Dresden Design project #3 - Lovely Lampshade

Dresden lampshade
This is a fun project that anyone can do in a short amount of time.
I had an old lampshade that I wanted to dress-up with SU's new Dresden Design die.
(If you do not have the Dresden Design, you can cut out your own Dresden pattern. 
Go to http://www.patternsfromhistory.com/colonial_revival/dresden-pattern.htm to print out the pattern.)


My lampshade is covered in SU Designer scrapbooking paper.  
It is a 2-sided paper, so I was able to use both sides 
(isn't it great that they are made to coordinate with eachother!).

To make your lampshade - 
1. cut dresden pieces using 2- 12x12 pieces of scrapbook paper.
    (You could also use a fabric instead.  I made two sizes. 
2. lay your paper pieces on the lampshade with smaller ones on top of large.
3. when you know that you have enough pieces, just pin them in place 
    (I did this so I can change it later, but you may want to glue it down if it is to be permanent.)


Since I am not a "pink" person, I made this one for display. 
After I take it off display, I will recover it with my colors.


For more ideas for the Dresden plate design search this blog 
and stay tuned for a few more amazing things you can do with this pattern.


Linking up with:
Jenny Matlock: Alphabe-Thursday

Saturday, February 4, 2012

Dresden Design Project #2 - O Christmas Tree

 Since it was snowing again today, 
I will take you to another Winter project - my Christmas trees 
made with the Stampin Up' Dresden die.

I made 2 types of trees.
One that is sewn and another that is hot glued.
Both are very easy.

Dresden Potted Christmas Tree
To make the sewn Potted Christmas trees:
1. cut 4 Dresden plate pieces out of 4 differant pieces of material.
2. sew those 4 pieces together with a 1/4 in seam allowance, 
    tapering the center to a point. 
3. turn piece right-side out and stuff with batting, stuffing, or cotton
4. use a long cinnamon stick for the tree trunk by pushing it into the center.
    (it should stay by itself if you have stuffed the tree tight enough,
     if not, use some glue)
5. for the pot, I used a napkin ring (use whatever you like, I crumbled some
   clear boxing tape and stuffed it into the base to make the tree trunk stand    
   in place - very professional, huh? It looks like ice :))
6. the white felt snow was made with another Stampin Up Sizzix Big Shot and     
   wrapped around the tree with hot glue to keep it in place. *Notice in the   
   first picture that the smaller tree has all of its bottom curves cut off and is  
   edged with more white felt cut with that same die.

***********************************
To make the hot glued cone Christmas Tree:
1. Choose 3-4 differant shades of green fabric and cut them out in the  
    Dresden plate pattern. (I used both sizes.)

2. Make a cone as the form of your tree. (I used a cardboard 12x12 piece that    
   comes in my SU scrapbook paper packs.)  My cone was about 8 in. high.
   *To make the cone - roll the paper in one hand (like the above picture)
   and secure with glue or staples.  Then, cut the bottom of your cone so that  
   it will sit flat (like the picture below).
3. Now hot glue your Dresden pieces onto your cone tree form.
    Start from the bottom and work up.  My large pieces on the bottom hardly  
    overlapped, but the top ones did.  When you get to the top, be sure your 
    last piece forms a point.
4. Place a star on top!


You can also make a tree wall hanging, like this one!

Hope you enjoyed these Wintry Dresden projects!