Since moving here to South Africa, I have been in search of inexpensive furniture.
Everything, even thrift shop furniture is very expensive.
Everything, even thrift shop furniture is very expensive.
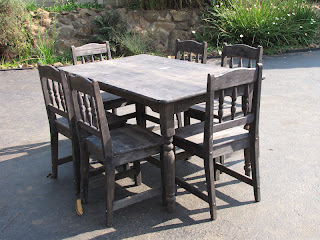
Finally, I found this table and chairs in the classifieds.
It was only around $60 for the hardwood table and 6 chairs!!!!!
Love to find a good bargain!
As you can see, it was in pretty bad shape.
The spindles on the legs were scratched at by the previous owner's cat.
It also had the worst coat of blackish paint or dark walnut stain, or whatever it was on it.
I decided that the best thing to do, would be to start by stripping the top,
to see if I could do the wood some justice.
So, I sanded the table top, table legs and the chair backs and seats.
For the table:
After a half coat of liquid stripper, used according to the label directions,
I decided it was time to get a little more serious about attacking the table.
Finally, after a thin coat and then 2 thick coats it started to look more like a wooden table.
Still you could see that black paint/stain, but it was alot better.
I decided to apply Golden Oak stain to the piece,
because all of my other pieces of furniture are Oak or Oregon Pine.
My first two coats of varnish were very thin.
I followed the directions on the can for drying times and then appied two more thick coats.
For the two thick coats, I allowed it to dry twice the drying time.
After a final top coat, it looked like this.
Now, what to do with those chairs.
After sanding the seats by hand, I applied a coat of varnish to the entire chair.
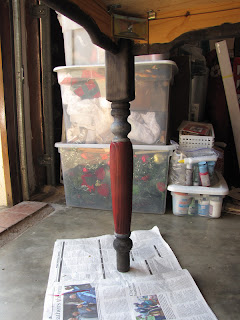
You can see in the above picture that I painted, just a part of the spindles red.
(The chair on the right is not finished.)
Now what about those ugly, cat-scratched legs?
When I sanded the legs, I had to sand some of the shape out of them.
Some legs had more curves than others.
I thought about what to do and remembered an old trick I learned years ago while painting.
Color catches your eye - yes!
It can also make something appear to be the same, but really be differant.
So, I got out my red paint (which I bought for the sewing table, I will hopefully finish soon).
For the largest part of the legs, I used that red, but for the small accents,
I used a cream colored acrylic paint.
The picture above on the left is just a leg that has been painted.
The picture on the right is a leg that has been varnished.
They really came out nice!
When you look at the finished project, the chairs, table, and table legs all look beautiful.
I am very happy with the finished project.
It was perfect for my Bible Study/Craft room.
I keep 2 of the chairs at my kitchen table.
Hopefully, I will soon get to post some more pictures from my home here in South Africa.
Thank you for reading about this "redo".
I cannot tell you how blessed I was to have such a project.
It was alot of hard work, but it was so rewarding,
PLUS, it made me feel like I was at home.
Being so far away from home, it is a blessing when you start to feel at home.
BEFORE AFTER
Linking up with:


3 comments:
It looks great! I like what you did with the legs. You have a cute place. Thank you for sharing this at Rustic Restorations Weekend.
Hey mum!
I love the table!!I miss you!I am praying for you!
Love You!
Gina Gina,
It looks like your house is beautiful! I can't wait to see more. I miss you and pray all is going well for you. Keep praying for us, God is working. :)
Love,
Anna
Post a Comment