Saturday, December 29, 2012

New Life for an Old Trunk


When my trunks arrived here in South Africa, 
they looked like this.

What the picture doesn't show you,
is that the bottoms are falling out 
from a "certain person" putting as much as she could possibly get in them.
(Yes, that "certain person" is me.)

Seeing how, there is always a need for more storage space,
I decided to give new life to these old trunks.

I started on the better looking of the two.
It is the one in the first picture covered in the faux wood contact paper.
It took a while to peal all of the contact paper off 
and then the layer of vinyl paint beneath.

(Hint: sometimes you don't need to buy harsh chemicals to strip things.
The paint seemed to be starting to separate in places anyway,
so I just used a scrapper and a wet rag.
 I found if I soaked the rag in water and laid it over the a section,
the paint would come off easily.)

Finally, when I got it stripped down to the original piece.
I gave it 2 coats of basic primer.
(Yes, the hardware store here is also one of my favorite stores,
 but not as nice a my favorite - LOWE'S in the States.)

After priming it, came the creative part.
I was not sure how I wanted to finish the trunk.
Then I thought about something I had wanted to try for a while.

My friend has done this with a picture frame.
Using the glue gun sounded fun, but I wanted a different look for this old trunk.
So, I decided to make it look like embossed leather.


After finding a large stencil that would work,
I began to trace the pattern onto the trunk.


Here is the pattern I chose for the sides.

When I went through my paints, I found a bunch of puff fabric paint.
It will work the same as a glue gun to give any project dimension.

Using the puff paints, I traced the stenciled pattern.

That first side came out so nice. 
I couldn't wait for it to dry.

This is what I found, the next morning.

Sadly, it was a wash out.
We were having rainy season here.
If you live in high humidity climates or if you are experiencing rainy season,
using the puff paint is not for you.

Don't worry, it was nothing the glue gun couldn't fix!

For the front and back I traced a different pattern...

...and then used my glue gun to follow the pattern.

When I came home from the store and started painting,
I didn't understand why after carefully looking for paint,
I chose this bright yellow.

What was I thinking????

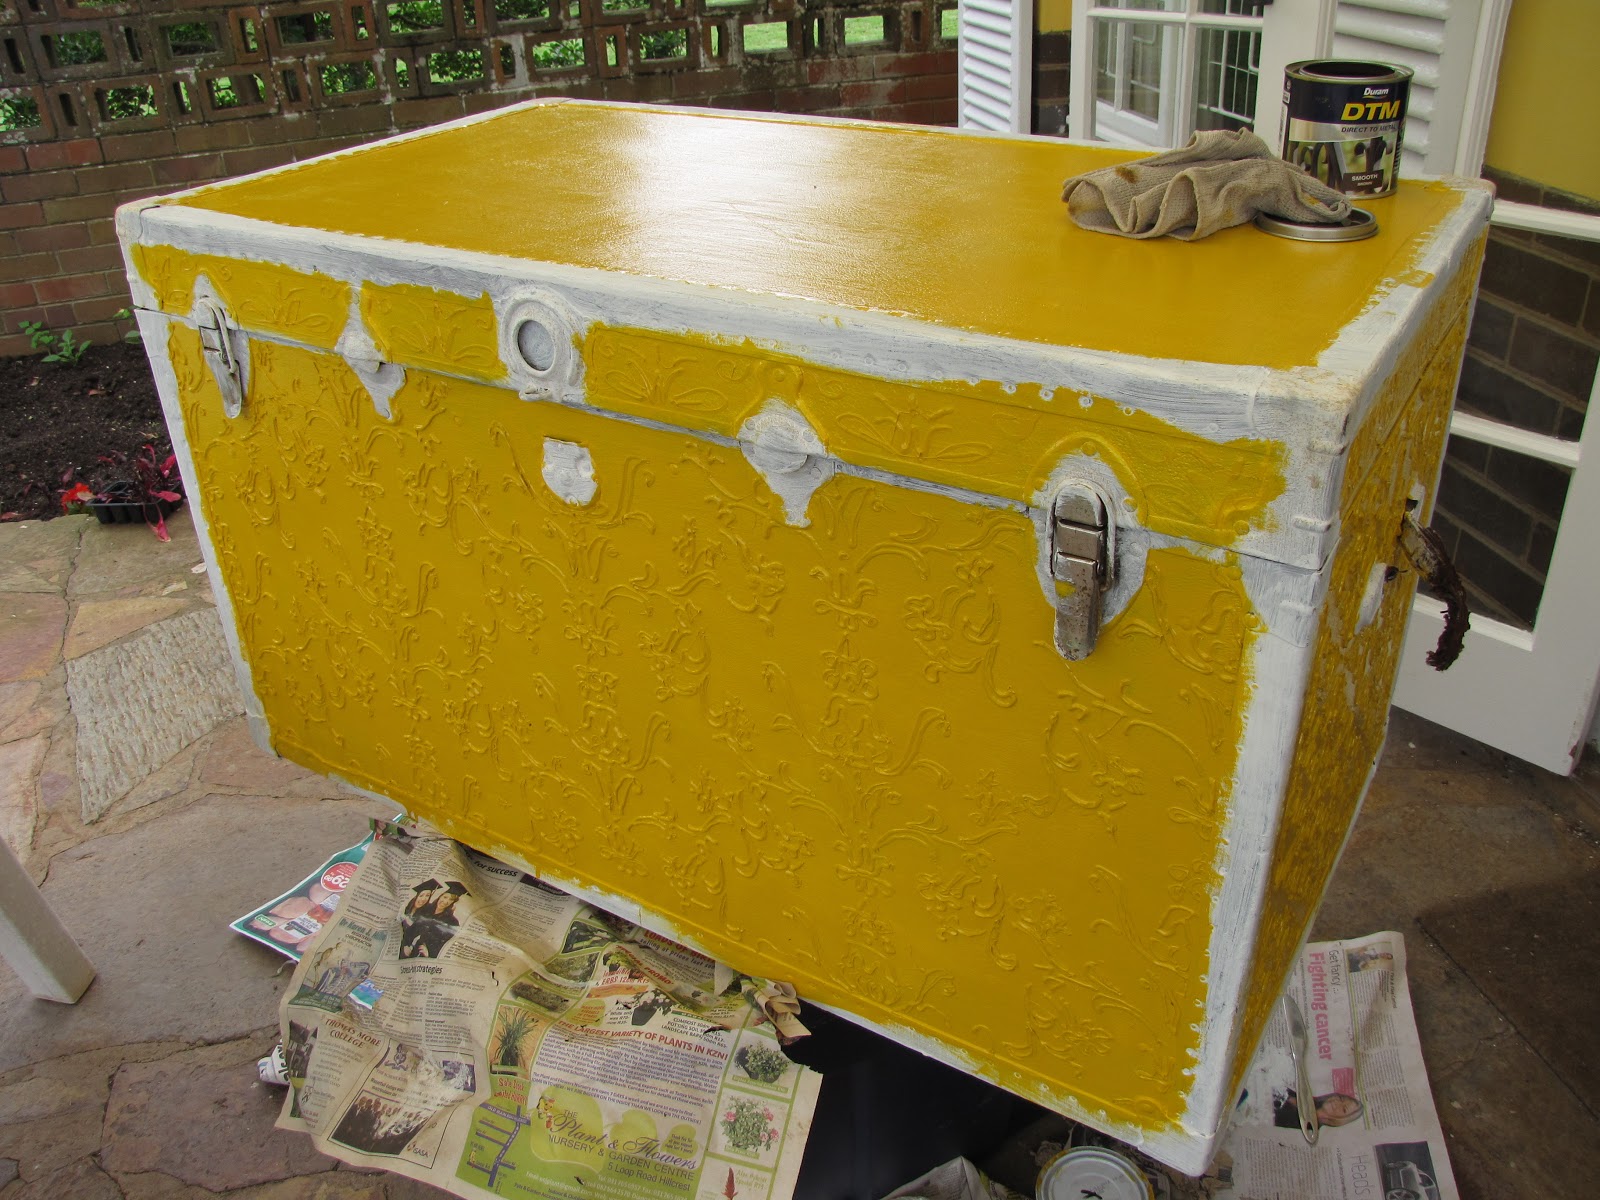
Personally, I think it was a product of living in a bright yellow house
(notice the yellow walls in the background).

For the top coat, I chose a dark brown DTM (Direct To Metal) paint.
I had never used this kind of paint.
It is now one of my favorites for projects like this.

Now I understand why I chose the bright yellow!
Using a rag, I applied the DTM Paint to my trunk in a circular motion.

As you can see, it brought out the pattern.

BUT, the color was still a little one dimensional for me.

Left: plain DTM           Right: brushed with gold
So, I dry brushed it with gold.
You can see the differance here.


The gold certainly adds color & dimension.

Now you can see all of the detail.
The faux embossed leather technique works great!
I love the way it looks in my house!

This project took me a few months to complete,
 because I only had 10 minutes here, or an hour there.
The gluing of the pattern was the most time consuming part of the project.
Now I have the other trunk to  redo!

I love to do these projects, because it reminds me of the work that God has done in me.
He has made me a "new creature".
2Corinthiams 5:17  "Therefore if any man be in Christ, he is a new creature: old things are passed away; behold, all things are become new."
He has given me a "new life".
Romans 6:4  "Therefore we are buried with him by baptism into death: that like as Christ was raised up from the dead by the glory of the Father, even so we also should walk in newness of life."


I hope you too have that "newness" that can only be found through Jesus Christ our Lord.

Linking up to:

Sunday, December 23, 2012

Have yourself a vintage little Christmas

This year for my Christmas tree,  I didn't know what to do.

I didn't have money to buy things, so I decided to make them.
I bought an old book by Charles Dickens (how fitting), 
and punched out snowflakes with a paper punch.
Laying them in piles of 3, I sewed them in a line to make a paper tree garland.

Now for the ornaments.
I made 3 different "vintage - like" ornaments.

First, this green Christmas bulb.

The base is made out of an egg carton. 
I cut out the dome shapes,...

...poked a hole through each end,....

...put some gold string through,..

...with a red bead on the top and bottom,...

...then hot glued the domes together.

 After that, I created a swirly pattern in the center.

They looked like this.

I painted them an olive green, brushed some gold nail polish over the swirls,
and added some red glitter dots - VIOLA!!!!

They came out so nice!!!!

To continue on with the vintage theme, 
I used more of the pages from Dicken's book to make some of these.
(sorry for the lack of photos, I got carried away with making them and forgot to take photos).
It is just a strip of the book about 8-10 in long X 2 in wide,
 folded at every half inch,
glued together at the ends to form a disc with a glittery red circle and snowflake on top.

Next, I got online an found some vintage Christmas card graphics.

I made them all the same size (about 3in x 1 3/4 in).

Cut them out and put them between clear boxing tape.
Everything here gets moldy from the humidity,
 so I thought it might help to put them between plastic.

After that, I cut the extra plastic off
and painted little accents with glittery snow paint and that red glitter paint.

I punched a piece of gold foil crepe for the background paper 
and added some red ribbon.

It is fun to look at all of the different vintage cards on my tree!
Maybe this will inspire you to do something new for yours next year.

Have yourself a vintage little Christmas!

Liking up to: Rustic Renovations:
<center> <a href="http://homespunhappenings-tammy.blogspot.com/search/label/Rustic%20Restorations%20Weekend" target="_blank"><img border="0" alt="Homespun Happenings" src="https://lh4.googleusercontent.com/--ln6SmqF7Z0/T_YJEtaH6II/AAAAAAAAAs8/b6exg1qyVgs/s200/Copy%2520of%2520Our%2520bedroom%25202012%2520055-001.jpg"/></a></center>

Thursday, December 6, 2012

2 Rag Rugs


As I was cleaning out my closet in preparation to come to South Africa,
I came across a bunch of old twist skirts and sundresses.
Most of them were torn or stained (because I painted in them).
I really didn't want to throw them away because I thought something could be done with them.
Fabric is becoming more and more expensive.
I knew I couldn't hold onto anything unnecessary to take with me.

What to do?
There's an old saying that goes-
"When life gives you scraps make quilts".
I can't make a quilt with it, but how about a rug?

Maybe I should make a rag rug.
My mother has made a number of rag rugs, so I thought I would give it a try.


First step was to cut all of the skirts and dresses into 1 1/2 inch long pieces.
I actually found that I could start at the bottom of the skirt 
and get to the top by cutting one very long strip.
Kind of like a swirl all the way around the piece.

After all of the strips were cut, I rolled them into balls (like a skein of yarn).
Then I looked at the colors.
Appearantly I wear the colors I like and use in my house.
I was hoping to have alot of red and yellow in my kitchen in South Africa.

At first I was not sure what shape to make.
Maybe I should stitch a square of a circle?

Anyway, the project started out with the small rusty red circle
and grew into this flower.


As you can see in the above picture,
I did several rows in a circle.
Then I chain stitched up and put several stitches in one hole in order 
to achieve the look of flower petals.

After using all of the rusty red and ruby red that I had,
I looked on my pile of rags for more possibilities.
I decided to make leaves for my flower.

When that was finished I thought it needed to be a little bigger.
So, I  crocheted in between the leaves to make it circular.

Tips for doing this project:
- use the largest crochet needle you can buy
- Always edge the details in your rug with darker colors,
especially around the outer edge
(this will help it to continue to look nice after future wear and tear,
it also helps to bring out the colors in your rug)


Well, here is the finished rag rug.
It made it to my kitchen in South Africa!


My kitchen is very narrow,
so it fits in perfectly.
I also love the colors!


This is one of my favorite projects that I have do so far.
It was so much fun making on before I came here.


Anticipating where I might live and what I might put in my
house made it even more rewarding when I was finally able to unpack my shipping crates 
and move into my own house.

Just last week, I realized that I could do something about those muddy foot prints that I always seem to have on the floor from going in and out to the garden.
I went through some of my supplies and decided to make a second rug.

This time I used yarn.  
I think it is called ribbon yarn (burgundy and blue) and flag yarn (yellow).
For this rug, I used a medium sized crochet hook.
I was not sure which size to use, so I just crochet a few rows
in a few differant sized until I found the one I liked.

This time, I only needed a small mat for infront of my veranda door.
I was limited in my supply too, so I decided to just do a half flower,
following the same idea as before.


This is what it looked like when I finished it.
I am a bit of a perfectionist, 
but I was also too far along to make myself take it all out and start again.


What was I going to do about the bumps in the rug?
I knew I would trip over it every time if I didn't do anything about it.


Then I thought,
the yarn is acrylic, so it should shrink a little when heated.
I got out my trusty heat gun!
The heat gun allowed me to give concentrated heat just where I needed it to be.
I also found that the yellow flag yarn shrunk but the other didn't.
While I was heating it, I thanked God for the little ways He blesses us in life.
I didn't plan to have to do this step,
but He allowed that the yarn I needed to heat was the one that would shrink.
Thank you, Lord!

This is my rug before being heated.

This is the rug after being heated.

I know, isn't it great!


Hopefully, this has inspired you to use some 
of those rags or scraps that are just lying around.
"When life gives you RAGS,
make RUGS!"

Linking up with: